Using Twig as an RPC Server
Twig can be used in two modes. It can used directly as an XNA library,
or it can be built as a server application that supports a simple text-based TCP
protocol.
Overview
All objects on screen in Twig have a name string associated with them that
can be used to identify them in commands. The RPC server allows you to
call object methods by transmitting "objectname:
methodname args ..." over a TCP connection. In principle, any method
can be called. However, there is the practical limitation that the server
needs to understand how to parse its arguments from the text string. The
current system understands how to parse numbers, vectors, object names, strings,
Booleans, and null.
Getting started
The Twig distribution includes an example project, ServerTest, that provides
basic server functionality and that can be used as an example for building new
server projects (see building a new
server project). It also includes an example client, TestClient, that
you can use to manually send commands to the server.
To try the example applications:
- Open the Twig distribution in Visual Studio (if you use Visual C#
Express, it may complain that a particular project type is not supported;
ignore this).
- Choose Build Solution from the Build menu (or just press F6).
- In the solution explorer on the right, right click on ServerTest
project, and chose Start New Instance from the Debug menu. You should
see a Twig window pop up with no characters in it.
- Go back to the solution explorer, right click on the TestClient project,
and choose Start New Instance from the Debug menu. You should see a
new window with a button labeled Connect.
- Press the Connect button. You should now see something like this:
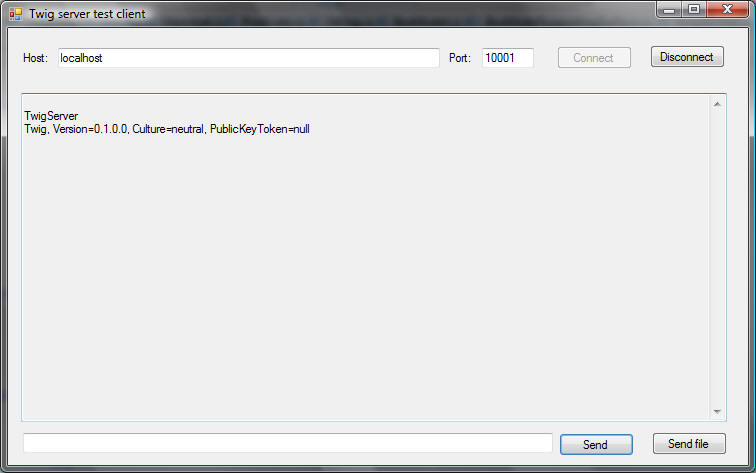
- You can type commands in the bottom text box and transmit them by
hitting Enter or pressing the Send button. You can also send entire
script files using the Send file button. Responses will be displayed
in the text area above.
- Enter the following command:
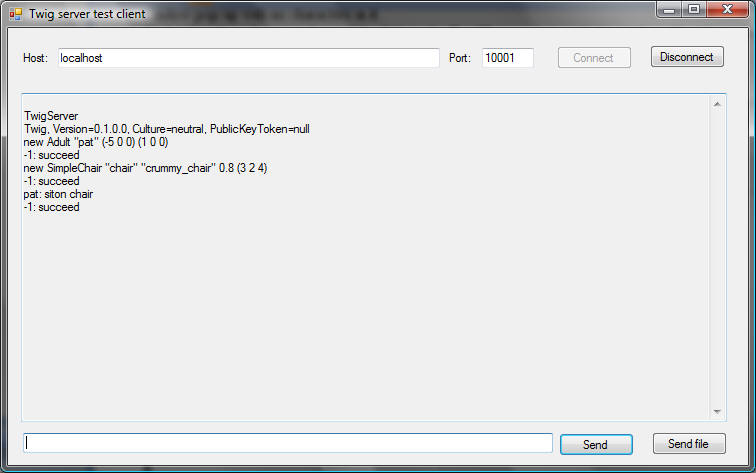
new Adult "pat" (-5 0 0) (1 0 0)
and hit Send. You should see a character appear in on the left side of
the screen, at position (-5, 0, 0), facing along the positive-X axis.
You should also see "-1 Succeed" displayed in the client.
- Now type:
new SimpleChair "chair" "crummy_chair" 0.8 (3 2 4)
A chair should appear on the right side of the screen. Again, the "-1
Succeed" message will appear.
- Now type:
pat: siton chair
and hit Send. You should see the character walk over to the chair and
sit down. This time, however, the "-1 Succeed" message will not appear
until the character completes the action. At this point, the client
should look something like this:
- You can quit the server either by clicking its close box or by using the
client to send the comment "exit".
TCP Protocol
The Twig server simply listens on a TCP port and talks a simple text-based
protocol. It's intended to be driven by planners or other systems running
in separate processes and written in different languages such as Java. If
you write your client in one of the .NET languages, such as C#, it's probably
best to link to Twig as a library and run it all in one process.
Connection
To connect to the server, simply connect to the appropriate TCP port on the
machine running the server. The default port as of this writing is 10001.
There is no handshaking protocol once the TCP port is opened, however, the
server will respond with two lines, "TwigServer", and the version string for the
Twig assembly (library) itself. This will look something like "Twig,
Version=0.1.0.0, Culture=neutral, PublicKeyToken=null".
Command protocol
Commands are sent as single text lines of the form:
[ requestID ] command
N.B: the brackets are not typed, they mean that the requestID is
optional. The optional requestID is an arbitrary decimal integer
the server will use as a prefix to any status messages (such as Succeed or Fail)
generated by this request. The client is free to omit or reuse
requestIDs. The default requestID is -1, so all commands
without an explicit requestID will have ID -1.
Status messages arrive asynchronously and take one of the following forms:
requestID: succeed
requestID: fail
requestID: fail ExceptionType:
message
requestID: message text
where requestID specifies which request this message is attached to
(-1 if no requestID was specified in the command). Succeed means the
command terminated normally. Fail means the command failed and terminated.
If an exception was thrown, the second form of fail is used. Message is a
status message generated by the command. It does not indicate that the
command has terminated.
Specific Commands
Any command from the scripting language
can be used.
Reporting data from the server
These commands are only available within the RPC server. They are
called as methods on the object named "server":
| Command |
Description |
| server: report
fieldOrPropertyName |
Prints the value of the specified property for every TwigObject |
| server: report
fieldOrPropertyName includeStatic |
Same, but if includeStatic is false, objects tagged as
static (e.g. trees) are omitted from the list. |
| server: report
fieldOrPropertyName includeStatic interval |
Same, but continually prints the information at the specified
interval (in seconds) |
Reports are returned in the format:
requestID: message objectName=value
...
The requestID will be -1 if none was specified in the report
command. One objectName=value clause will be included
for each object being listed. If a repetition interval is
specified, then multiple messages will be generated for this request and no
succeed message will be generated (because the command will never terminate).
For example, you can obtain a steady report of the locations of objects using
the command "17 server: report "Position" true 1.0", which would then generate a
report similar to:
17 message pat=(5 0 0) table=(324)
each second. Changing the 17 to another number will change the
requestID at the beginning of the message, whereas changing the 1.0 to 0.5 will
cause the system to generate reports twice a second rather than once a second.
You can build a new server project in one of three ways:
- Clone the source tree and edit the ServerTest project in place
If you're just experimenting with the system, this is the easiest thing to
do.
- Duplicate just the ServerTest project folder
You can do this, but it's a little more of a pain. You then want to
change the names of the folder and of the ServerTest.* files inside the
directory. Finally you want to edit the project file itself and change
the name of the project. To really do it right, you also need to
change the GUID of the project in the project file.
- Start from scratch
To make a new project from scratch,
- Right click on the top level item in the solution explorer and
choose Add>New project
- Fill in the name for the project
- Choose Windows XNA game project and click ok
- Right click on the References section of the project and choose Add
reference, then select Twig and TwigServer from the Projects tab.
- Open the Content section of the project and select its
References section (not the references of the main project), and select
Add reference, then choose Twig Content Processors from the Projects
tab.
- Copy the body of the class definition from ServerTest.cs into your
Game1.cs file (or whatever name it has). The main thing you want
is the InitializeTwigObjects() method. This will install the
boilerplate objects such as the camera, as well as the TwigServer
object.
- If you want to use any of the assets in the ServerTest project, such
as the chair model, you will need to explicitly copy them over and add
them to the Content subproject.
Changing the server's port number
The server's port number is specified in the constructor for the TwigServer
object. To change the port number, simply change the line:
Components.Add(new TwigServer(this));
in the InitializeTwigObjects() method of your server to:
Components.Add(new TwigServer(this, portnumber));
The default port number is specified by the constant TwigServer.DefaultPort,
which as of this writing is 10001.
Adding models and other assets to the server
XNA includes a set of extensions to the Visual Studio build system to
translate media assets such as models, texture maps, sounds, etc. into an
optimize binary form that can be rapidly loaded at run time. Each asset is
stored in a .xnb file in the Content subdirectory of the application.
Adding assets to the server project
The most straightforward way to add assets to the server is to add them to
the project for the server inside Visual Studio. To add a media asset to
the server:
- Copy the file (e.g. a .x file for a 3D model) to the Content
subdirectory of the source directory for the project (e.g. the Twig\ServerTest\Content
directory if you are adding to the ServerTest project).
- In Visual Studio, go to the solution explorer, and right-click on the
Content subproject of the server project.
- Select Add>Existing item
- Select the file and click OK.
- Run the project as normal.