
Welcome
This project is a set of challenges, building a React app using functionalities commonly needed in React web apps need, including functional components, JSX, styling, routing, forms, hosting, database, and authentication. Additional tools used include Tailwind, Tanstack Router, and Firebase. It does not use class-based components, lifecycle methods, or a state manager like Redux.
This project is also about some of the skills required to use generative AI in software development, such as how to
- configure and manage agentic AI with a mix of large-language models
- create specification prompts that accurately capture the needs and constraints of the problem, without overspecifying the solution
- understand genAI output well enough to identify what's missing and what's unnecessary
- avoid or at least identify and remove unmaintainable AI slop.
Of these skills, the first one -- configuring agentic AI -- is the least interesting, as details change weekly. The remaining skills -- specification, code review, along with rapid iteration, deployment, and testing of ideas -- have changed little over the years. Only their application to genAI is new.
Prerequisites
You need a Google account that can access to Firebase. The Northwestern Gmail accounts do not have Firebase access. You can test by visiting the Firebase home page. If your school Google account doesn't work, create a personal one.
You need a Github account.
You should know basic HTML, CSS, modern JavaScript.
You should know how to open a terminal shell and run Unix-style commands. On MacOS, use the Terminal application. On Windows, use git bash, a small version of Linux that is installed with git. See the Resources for how to add it to VS Code.
You do not need to know React, but you should read the subsection React starting points to get an idea of how React programming differs from regular HTML or JavaScript.
You need the following installed:
- Git
- VS Code
- NodeJS -- at least version 24
Resources
- Hello, JavaScript -- my introduction to modern JavaScript
- Git home
- Github home
- NodeJS
- Git
- VS Code
- How to add Git Bash to VS Code -- needed to use the Firebase command line interface (CLI) in a VS Code terminal
How this challenge works
In this challenge, you make and deploy changes to a class scheduling app for students written using React and Firebase. The initial app just displays a short list of courses. The changes involve fetching more realisitic data, adding a user-friendly display, adding interactivity, and adding security, so that students can use the app and administrators can modify the data.
A task is complete only when the specified functionality is working on the deployed site and the code is committed to Github.
You need to do a set-up tasks first to create and deploy a verion of the app that shows a list of courses. After that, you can choose challenges based on what you want to practice next. Some task descriptions specify prerequisite task that must be done first.
You can also do tasks not in the list. Post ideas for new tasks to the class discussion system. You do not need permission, but by posting, other people can try the same thing, and I can warn you if something is much harder than you think.
- Setup -- do before any other task
- Styling with Tailwind
- Data
- Getting data from a network call
- Getting data from Firebase
- Interactive Logic (first do either "getting data" task)
- Interactive data filtering
- Time-conflict catching
-
Forms (prerequisite: first do getting data from Firebase)
- Creating a form editor
- Saving a form to a database
-
Authentication and authorization (first do getting data from Firebase)
- Authentication
- Security rules
- Role-based authorization
Resources
- My notes on genAI for prototyping
- React Challenge starter template -- use npx git-pick to create an empty repository in which to create your initial app
Learning with genAI
Many studies suggest that following an AI-first strategy, such as having AI do a first draft, makes you less skilled but feel more skilled. This is called the illusion of competence. People believe that if they can understand an answer that someone (AI or not) wrote, then they could have come up with that answer on their own. This is rarely true.
My classes use an AI-second strategy called Commit and Consult. First, you try to solve the probem yourself -- not completely, but the important bits. Then you ask genAI to solve the problem and carefully compare what you expected with what genAI did. You record this in a Google document. A template is in the Resources.
The key steps that repeat for every task are:
- Pick a task to do because there's skill you want to learn.
- Write a specification prompt for the desired functionality.
- Write what needs to be built to do this, in English.
- Write what's needed in real code (React, JSX, CSS, ...).
- Note what resources you studied to do the above.
- Give the specification to genAI.
- Compare what you expected with what AI and write which you think is more correct, and why.
In your first few tasks, you should expect to use commit and consult with most parts of a challenge task, from data fetching to JSX to styling. In later tasks, use commit and consult for just the new bits. Choose specific parts of each task to maximize what you will learn.
Most of the code you will commit and deploy will be genAI code, after you have fixed any issues, either directly or through genAI.
Resources
- Is AI Making Us Stupid? -- full access available on Northwestern campus or VPN
- React Challenge Learning Report template -- you will use a tool to create reports from the template for each task
- An example of commit and consult when I tried writing code to unit test a React component .
Initialize the React app
This task has two goals:
- create a repository and deployed web site that you will build upon in your remaining challenges
- practice creating a React challenge learning report
Get the repository template
Use the React Starter template to create the initial repository. See link below. After installing a copy of the starter, open it to see what it contains:
- .github/copilot-instructions.md: a set of instructions that tell CoPilot how to write modern React, TypeScript, Tailwind, and Firebase code
- an example of a specification for code in a Markdown file, that includes an image of what the result should look like
Start a React Challenge learning report
Go to the React Challenges Progress sheet. The link is on Canvas. Enter a name for this first task, e.g., "setup repo", in the first task column.
Click on that task cell to make it the current cell, then click on the Report Tools menu at the top of the sheet and select Start report for task.
The first time you do this, Google will ask for permission to create and modify files. Check to allow all the permissions requested and confirm. A script will then generate a fresh learning report for the task, store it in a folder under your name, and make a link to the new document in the spreadsheet. Click that link to open it. Email me or post to Piazza if anything is wrong.
Commit and consult
Answer the questions in the learning report. The initial questions are where you commit yoursef. When it asks what specification prompt you are using, put whatever you decided to use in docs/slice1.md. Spend the most time on the questions asking you to describe in English what kind of code you think is needed, and then what specific React code you expect to be written.
Now consult genAI. Open the CoPilot chat and ask it to "Implement the app described in the file slice1.md". Add that file to the chat context. After CoPilot chugs away for a while, look at the code it wrote.
Compare what you predicted with waht you see the learning report. Do this in line-by-line detail. Assume every difference matters because it almost certainly does.
Test and deploy
Fix whatever you think needs fixing in the app. Make simple changes yourself. Ask CoPilot to make more complicated changes that affect multiple lines of code. When the app is running the way you want
- Install Firebase hosting and deploy the app
- If there are bugs with the deployed version running on Firebase, fix.
- Commit and push the final code to Github.
Resources
- Installing node
- the React Challenges Starter template if you are using the Commit and Consult process with CoPilot.
- Hosting on Firebase
Report progress
When this is working on the public web site and the code has been pushed to Github, go to the Progress Report sheet. Select the task cell and then select Mark task done from the Report Tools menu.
Display a list of courses
Your first task is to replace the dummy code in src/App.tsx with code that displays a small schedule of CS courses, like this:
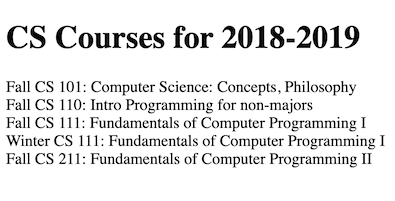
The data will be hard-wired in the code in JSON format. You have two JSON options. The Realtime JSON mimics the structure of a Firebase Realtime database. The Firestore JSON mimics the structure of a Firebase Firestore database. Firestore is preferred these days.
const schedule = {
    "title": "CS Courses for 2018-2019",
    "courses": {
      "F101" : {
        "term": "Fall",
        "number": "101",
        "meets" : "MWF 11:00-11:50",
        "title" : "Computer Science: Concepts, Philosophy, and Connections"
      },
      "F110" : {
        "term": "Fall",
        "number": "110",
        "meets" : "MWF 10:00-10:50",
        "title" : "Intro Programming for non-majors"
      },
      "S313" : {
        "term": "Spring",
        "number": "313",
        "meets" : "TuTh 15:30-16:50",
        "title" : "Tangible Interaction Design and Learning"
      },
      "S314" : {
        "term": "Spring",
        "number": "314",
        "meets" : "TuTh 9:30-10:50",
        "title" : "Tech & Human Interaction"
      }
    }
  };

  const App = () => (
    ...
  );

  export default App;
const schedules = {
"CS-2018-2019": {
title: 'CS Courses for 2018-2019',
courses: {
"F101": {
term: "Fall",
number: "101",
meets: "MWF 11:00-11:50",
title: "Computer Science: Concepts, Philosophy, and Connections"
},
"F110": {
term: "Fall",
number: "110",
meets: "MWF 10:00-10:50",
title: "Intro Programming for non-majors"
},
"S313": {
term: "Spring",
number: "313",
meets: "TuTh 15:30-16:50",
title: "Tangible Interaction Design and Learning"
},
"S314": {
term: "Spring",
number: "314",
meets: "TuTh 9:30-10:50",
title: "Tech & Human Interaction"
}
}
}
};
const App = () => (
...
);
export default App;Resources
- Defining App
- Defining a basic component
- Displaying a list of components
- Importing code, data, and assets
- Objects and arrays
-
Choose a Database: Cloud Firestore or Realtime Database
-- Google's arguments for Firestore over Firebase
- This leaves out one point in favor of Firebase Realtime: testing with emulators. An emulated Firebase Realtime database can be easily initialized wuith a JSON object. Firestore initialization requires code to store documents.
Report progress
When this is working on the public web site and the code has been pushed to Github, update the progress report and pick your next task.
Change the app title and icon
Background
This challenge is short but different. As you develop React apps, you may notice that every app has the same name and icon in the browser tab and browser history, e.g., "React App" with the React atom logo. Why is that and how do you fix it?
The React apps we are building are called single page applications. That means they are implemented as a single HTML web page. Tools that create a React app create an index.html file. That files laods your React code. When the user interacts with the page and new information must be shown, your React code creates new HTML to show on that page, rather than going to a new page.
Unfortunately, React code can only update the body of the web page. The page title and favicon (the little icon in the browser tab) are set in the head of the page. Your jchallenge is to fix that.
Challenge
Edit index.html so that the page title is "CS Course Scheduler" and the favicon is something you create that is distinctive and appropriate for a scheduling app.
Resources
Report progress
When this is working on the public web site and the code has been pushed to Github, update the progress report and pick your next task.
Make a Card UI with Tailwind
Add CSS styling so that the list of courses looks more like this:
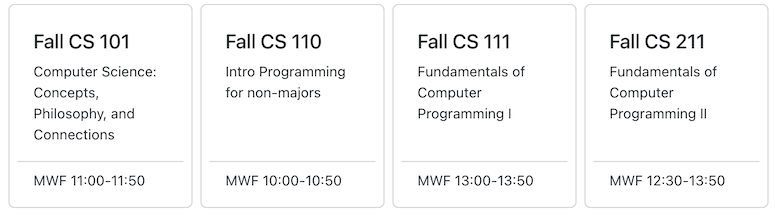
Depending on screen width, course cards may need more than one row. Each row should fill the available screen width. Cards on the same row should appear uniform in height and internal spacing.
Resources
CSS for styling is both powerful and complex. It's a large programming language unlike any other. While it's not hard to use CSS to adjust fonts, colors, and margins, doing layout becomes trickier, and developing a consistent clean look and feel for an entire app requires much experience and solid design skills. Most developers use CSS libraries to provide a consistent basic look and feel, such as Bootstrap or Material UI.
Tailwind is becoming increasingly popular. It takes a very different approach. It defines 100s of small utility classes that you combine and apply directly to HTML components. Tailwind is used in all our examples, and many examples online elsewhere.
- Notes on Tailwind CSS -- introduction to Tailwind CSS version 4 basics. Tailwind 4 was released in January 2025.
Report progress
When this is working on the public web site and the code has been pushed to Github, update the progress report and pick your next task.
Fetch data
Delete the dummy schedule at the start of App.tsx. Replace it with code to fetch a list of courses from
Realtime Database Schedule
Firestore Schedule
This URL can be accessed from any server, including a local test server, without getting a CORS exception.
This task is done when the app is displaying all the CS classes for fall, winter, and spring.
Links
There are quite a few concepts to learn here, states, effects, asynchronous functions for queries, and custom hooks. See the following examples and notes:
Report progress
When this is working on the public web site and the code has been pushed to Github, update the progress report and pick your next task.
Implement a term filter
Implement an interactive user interface element to let users choose whether to see classes for fall, winter, or spring. Key steps in this task:
- A term selector component that holds three button, for Fall, Winter, and Spring respectively.
- A term page component that holds the term selector and course list.
- A selected term state variable that is initially set to Fall.
- Code in the course list component to only show classes that are in the selected term.
- Code in the term selector to change the selected term state when a term button is clicked.
This task is done when clicking on the Fall, Winter, or Spring buttons immediately updates the set of classes is displayed.
Links
Report progress
When this is working on the public web site and the code has been pushed to Github, update the progress report and pick your next task.
Implement selecting courses
Change the user interface so that clicking on a course card adds it to a list of selected classes. Clicking a course already selected unselects it. Selected classes should highlight in some clear way, e.g., change in background color, text, or added icon, such as a checkmark.
This task requires defining a new state variable to hold the list of selected classes, code to add or remove a class from that list, and code to display a course different depending on whether it is selected.
The task is done a user can select and unselect any number of classes on the deployed app.
Links
See the following examples and notes:
Report progress
When this is working on the public web site and the code has been pushed to Github, update the progress report and pick your next task.
Implement a schedule pop-up
Change the app so a user can click a "course plan" button to see a pop-up listing the classes they've selected so far -- numbers, titles, and meeting times. If no courses are selected, the pop-up should have text that says that, along with brief instructions on how to select courses. The pop-up should have a button to close it. Clicking outside the pop-up should also close it, but clicking anywhere inside the pop-up should not.
A reasonable place for the course plan button on the same line as the term selector but on the right side of the screen.
Links
See the following examples and notes:
Report progress
When this is working on the public web site and the code has been pushed to Github, update the progress report and pick your next task.
Catch time conflicts
Make it impossible for a user to select a class that has a time conflict with classes they've already selected. A course card should be selectable only if it does not have a time conflict with any currently selected class. Unselectable courses should be marked in some way, e.g., fainter color or a small "x" somewhere. The visual display should update immediately when classes are selected and unselected.
Two classes have a time conflict if they meet in the same term,
have at least one day in common, and their timespans overlap.
A class meeting time is either the empty string
or a meeting string like MWF 9:00-9:50 or
TuTh 14:00-15:20. Any non-empty subset of days
is possible. No day appears twice. The start time is always
strictly less than the ending time. Times run from 0:00
to 23:59. Classes with an empty meeting string never
have a time conflict.
The code for calculating conflicts should be clean and maintainable, broken down into short well-named functions, and placed in a JavaScript utility file that exports only the functions needed by the React component(s) that check for time conflicts.
This task is done when the deployed app only allows users to select classes with no time conflicts. Make sure unselecting still works!
Links
Most of the code for detecting time conflicts can be done with very short functions, for specific subtasks such as detecting day overlap and time overlap. See the following examples and notes:
- Defining JavaScript code modules
- Array methods
- String properties and methods
- Working with mixed types
Report progress
When this is working on the public web site and the code has been pushed to Github, update the progress report and pick your next task.
Add a course form
Add a form that contains text input fields for the title and meeting times for a course. Then add a link or button on each course card to open the edit form, populated with that course's data.
Don't worry about form submission. There should be a Cancel button, but no Submit button. The form should have an onSubmit() method that does nothing. Clicking the Cancel button should return the user to the main course list.
Links
This task introduces two big topics: forms and routes.
Routes are used in React apps that have multiple screens (analogous to web pages). Many apps have a main screen and a user profile screen. Some apps have many more.
See the following examples and notes:
- Better app navigation with routes
- Forms in React -- skip form validation; that's in the another task
Report progress
When this is working on the public web site and the code has been pushed to Github, update the progress report and pick your next task.
Add form validation
Add code to check that the form data is valud course data and give user feedback about which fields have bad data.
This involves define a type schema for course data and a validator function that can be used a a resolver in the form. At a minimum:
- the course title must be at least two characters, e.g., "AI" would be accepted but not "X"
-
the term must be the string
Fall,Winter,Spring, orSummer - the course number must be a string that is a number with an optional section, e.g., "213-2"
- the meeting time must be either the empty string or a legal meeting time with one or more days and a non-empty timespan.
Helpful messages should appear next to form fields with invalid data, such "must contain days and start-end, e.g., MWF 12:00-13:20".
Links
See the following examples and notes:
Report progress
When this is working on the public web site and the code has been pushed to Github, update the progress report and pick your next task.
Add a database
Put the course data into either Firestore or Firebase, so that in another task users will be able to add and modify course data.
Data sources
Import into your database the JSON you've been testing with:
Realtime Database Schedule
Firestore Schedule
The task is done when the version is deployed to the public site gets its class data from Firebase. There should be no visual difference in how the app behaves.
Links
See the following examples and notes:
- Adding Firebase to an app
- Adding Firestore to an app
- Organizing Firebase Realtime data
- Defining a Firebase database hook
Report progress
When this is working on the public web site and the code has been pushed to Github, update the progress report and pick your next task.
Add form submission
Add the ability to save changed course data to the Firebase Realtime database when the user clicks a Submit button. Nothing should be submitted if there are any form field errors or no changes to any value.
Links
See the following examples and notes:
- Writing Firebase data
- Forms in React -- especially the part on submit handlers
Report progress
When this is working on the public web site and the code has been pushed to Github, update the progress report and pick your next task.
Add authentication
Change the app so that only users who are authenticated, i.e., signed in, can edit class information. This involves the following changes on the back-end Firebase side:
- Enabling authentication services for the project on the Firebase web console
- Add security rules to the database to allow write-access only for authenticated users
The following changes need to be made on the front-end React web app side:
- Adding code to the app to track the current authenticated user, if any
- Adding code to the app to let a user sign in and out
- Adding code to show a course edit button on each course card only to authenticated users
The best place for a button for signing in or out would be a banner component that appears on all screens.
Links
See the following examples and notes:
- Enabling Google authentication
- Implementing authentication with Firebase
- Authentication-enabled access in Database security rules
Report progress
When this is working on the public web site and the code has been pushed to Github, update the progress report and pick your next task.
Add role-based authorization
Change the app so that only authenticated users who are administrators can edit class information. This requires adding two things to the Realtime database:
- information about which users are administrators
- security rules to the database to allow write access only for authenticated users who are administrators
To get UIDs for users who log into your app, go to your project's Firebase console and look under Build | Authentication | Users.
In the React app, you need to add code to
- get database data for the authenticated user, if any
- show a course edit button on each course card only to authenticated users who are administrators
Links
See the following examples and notes:
- Implementing user profiles
- Implementing role-based authorization
- Role-based access in Database security rules
Report progress
When this is working on the public web site and the code has been pushed to Github, update the progress report and pick your next task.